Building clusters
Docker-Swarm cluster
This tutorial sets up a complete Docker infrastructure with Swarm, Docker and Consul software components. It contains a master node and predefined number of worker nodes. The worker nodes receive the ip of the master node and attach to the master node to form a cluster. Finally, the docker cluster can be used with any standard tool talking the docker protocol (on port 2375).
Features
creating two types of nodes through contextualisation
passing ip address of a node to another node
using the cloudsigma resource handler
utilising health check against a predefined port
using parameters to scale up worker nodes
Prerequisites
accessing an Occopus compatible interface
target cloud contains an Ubuntu 18.04 image with cloud-init support
Download
You can download the example as tutorial.examples.docker-swarm .
Steps
The following steps are suggested to be performed:
Open the file
nodes/node_definitions.yamland edit the resource section of the nodes labelled bynode_def:.you must select an Occopus compatible resource plugin
you can find and specify the relevant list of attributes for the plugin
you may follow the help on collecting the values of the attributes for the plugin
you may find a resource template for the plugin in the resource plugin tutorials
The downloadable package for this example contains a resource template for the Cloudsigma plugin.
Components in the infrastructure connect to each other, therefore several port ranges must be opened for the VMs executing the components. Clouds implement port opening various way (e.g. security groups for OpenStack, etc). Make sure you implement port opening in your cloud for the following port ranges:
Protocol
Port(s)
Service
TCP
2375
web listening port (configurable*)
TCP
2377
for cluster management & raft sync communications
TCP and UDP
7946
for “control plane” gossip discovery communication between all nodes
Note
Do not forget to open the ports which are needed for your Docker application!
Make sure your authentication information is set correctly in your authentication file. You must set your email and password in the authentication file. Setting authentication information is described here.
Load the node definition for
dockerswarm_master_nodeanddockerswarm_worker_nodenodes into the database.Important
Occopus takes node definitions from its database when builds up the infrastructure, so importing is necessary whenever the node definition (file) changes!
occopus-import nodes/node_definitions.yaml
Update the number of worker nodes if necessary. For this, edit the
infra-docker-swarm.yamlfile and modify theminparameter under thescalingkeyword. Currently, it is set to2.- &W name: worker type: dockerswarm_worker_node scaling: min: 2
Start deploying the infrastructure. Make sure the proper virtualenv is activated!
occopus-build infra-docker-swarm.yaml
Note
It may take a few minutes until the services on the master node come to live. Please, be patient!
After successful finish, the node with
ip addressandnode idare listed at the end of the logging messages and the identifier of the newly built infrastructure is printed. You can store the identifier of the infrastructure to perform further operations on your infra or alternatively you can query the identifier using the occopus-maintain command.List of nodes/ip addresses: master: <ip-address> (dfa5f4f5-7d69-432e-87f9-a37cd6376f7a) worker: <ip-address> (cae40ed8-c4f3-49cd-bc73-92a8c027ff2c) <ip-address> (8e255594-5d9a-4106-920c-62591aabd899) 77cb026b-2f81-46a5-87c5-2adf13e1b2d3
Check the result by submitting docker commands to the docker master node!
Finally, you may destroy the infrastructure using the infrastructure id returned by
occopus-buildoccopus-destroy -i 77cb026b-2f81-46a5-87c5-2adf13e1b2d3
Kubernetes cluster
Note
This Occopus-based version is now deprecated in favor of the Kubernetes Reference Architecture based on Terraform and Ansible.
This tutorial sets up a complete Kubernetes infrastructure with Kubernetes Dashboard and Helm package manager. It contains a master node and predefined number of worker nodes. The worker nodes receive the ip of the master node and attach to the master node to form a cluster. Finally, the Kubernetes cluster can be used with any standard tool talking the Kubernetes API server protocol (on port 6443).
Features
creating two types of nodes through contextualisation
passing ip address of a node to another node
using the nova resource handler
utilising health check against a predefined port
using parameters to scale up worker nodes
Prerequisites
accessing an Occopus compatible interface
target cloud contains an Ubuntu 18.04 image with cloud-init support
Download
You can download the example as tutorial.examples.kubernetes .
Steps
The following steps are suggested to be performed:
Open the file
nodes/node_definitions.yamland edit the resource section of the nodes labelled bynode_def:.you must select an Occopus compatible resource plugin
you can find and specify the relevant list of attributes for the plugin
you may follow the help on collecting the values of the attributes for the plugin
you may find a resource template for the plugin in the resource plugin tutorials
The downloadable package for this example contains a resource template for the Cloudsigma plugin.
Components in the infrastructure connect to each other, therefore several port ranges must be opened for the VMs executing the components. Clouds implement port opening various way (e.g. security groups for OpenStack, etc). Make sure you implement port opening in your cloud for the following port ranges:
Protocol
Port(s)
Service
TCP
2379-2380
etcd server client API
TCP
6443
Kubernetes API server
TCP
10250
Kubelet API
TCP
10251
kube-scheduler
TCP
10252
kube-controller-manager
TCP
10255
read-only kubelet API
TCP
30000-32767
NodePort Services
Note
Do not forget to open the ports which are needed for your Kubernetes application!
Make sure your authentication information is set correctly in your authentication file. You must set your email and password in the authentication file. Setting authentication information is described here.
Load the node definition for
kubernetes_master_nodeandkubernetes_slave_nodenodes into the database.Note
Make sure the proper virtualenv is activated! (source occopus/bin/activate)
Important
Occopus takes node definitions from its database when builds up the infrastructure, so importing is necessary whenever the node definition (file) changes!
occopus-import nodes/node_definitions.yaml
Update the number of worker nodes if necessary. For this, edit the
infra-kubernetes.yamlfile and modify theminparameter under thescalingkeyword. Currently, it is set to2.- &W name: kubernetes-slave type: kubernetes_slave_node scaling: min: 2
Start deploying the infrastructure.
occopus-build infra-kubernetes.yaml
Note
It may take a few minutes until the services on the master node come to live. Please, be patient!
After successful finish, the node with
ip addressandnode idare listed at the end of the logging messages and the identifier of the newly built infrastructure is printed. You can store the identifier of the infrastructure to perform further operations on your infra or alternatively you can query the identifier using the occopus-maintain command.List of nodes/ip addresses: master: <ip-address> (dfa5f4f5-7d69-432e-87f9-a37cd6376f7a) worker: <ip-address> (cae40ed8-c4f3-49cd-bc73-92a8c027ff2c) <ip-address> (8e255594-5d9a-4106-920c-62591aabd899) 77cb026b-2f81-46a5-87c5-2adf13e1b2d3You can check the health and statistics of the cluster. Please login to the master node via SSH connection.
Note
Before you run the command below, please make sure you use the correct user (kubeuser).
Switch to kubeuser:
$ sudo su - kubeuser
Check the nodes added to the cluster with the following command:
$ kubectl get nodes
NAME                                                             STATUS   ROLES    AGE    VERSION
occopus-kubernetes-cluster-a67dcbea-kubernetes-master-90d7cfdd   Ready    master   12m    v1.18.3
occopus-kubernetes-cluster-a67dcbea-kubernetes-slave-a8962b51    Ready    worker   4m7s   v1.18.3
occopus-kubernetes-cluster-a67dcbea-kubernetes-slave-ed210ec4    Ready    worker   4m7s   v1.18.3
Ensure that Kubernetes services have been set up correctly.
$ kubectl get pods --all-namespaces
NAMESPACE              NAME                                                                                     READY   STATUS    RESTARTS   AGE
kube-system            coredns-66bff467f8-ltkkc                                                                 1/1     Running   0          12m
kube-system            coredns-66bff467f8-ndh88                                                                 1/1     Running   0          12m
kube-system            etcd-occopus-kubernetes-cluster-a67dcbea-kubernetes-master-90d7cfdd                      1/1     Running   0          12m
kube-system            kube-apiserver-occopus-kubernetes-cluster-a67dcbea-kubernetes-master-90d7cfdd            1/1     Running   0          12m
kube-system            kube-controller-manager-occopus-kubernetes-cluster-a67dcbea-kubernetes-master-90d7cfdd   1/1     Running   0          12m
kube-system            kube-flannel-ds-amd64-5ptjb                                                              1/1     Running   0          4m23s
kube-system            kube-flannel-ds-amd64-dfczs                                                              1/1     Running   0          12m
kube-system            kube-flannel-ds-amd64-dqjg2                                                              1/1     Running   0          4m23s
kube-system            kube-proxy-f8czw                                                                         1/1     Running   0          12m
kube-system            kube-proxy-hlvd6                                                                         1/1     Running   0          4m23s
kube-system            kube-proxy-vlwk2                                                                         1/1     Running   0          4m23s
kube-system            kube-scheduler-occopus-kubernetes-cluster-a67dcbea-kubernetes-master-90d7cfdd            1/1     Running   0          12m
kube-system            tiller-deploy-55bbcfbbc8-fj8mm                                                           1/1     Running   0          9m16s
kubernetes-dashboard   dashboard-metrics-scraper-6b4884c9d5-w6rx6                                               1/1     Running   0          12m
kubernetes-dashboard   kubernetes-dashboard-64794c64b8-sb9m6                                                    1/1     Running   0          12m

You can access Dashboard at ``http://localhost:8001/api/v1/namespaces/kubernetes-dashboard/services/https:kubernetes-dashboard:/proxy/#/login``.

On the login page please click on the SKIP button.
Finally, you may destroy the infrastructure using the infrastructure id returned by
occopus-buildoccopus-destroy -i 77cb026b-2f81-46a5-87c5-2adf13e1b2d3
Slurm cluster
Slurm is an open source, fault-tolerant, and highly scalable cluster management and job scheduling system for large and small Linux clusters. Slurm requires no kernel modifications for its operation and is relatively self-contained. As a cluster workload manager, Slurm has three key functions:
First, it allocates exclusive and/or non-exclusive access to resources (compute nodes) to users for some duration of time so they can perform work.
Second, it provides a framework for starting, executing, and monitoring work (normally a parallel job) on the set of allocated nodes.
Finally, it arbitrates contention for resources by managing a queue of pending work.
This tutorial sets up a complete Slurm (version 19.05.5) infrastructure. It contains a Slurm Management (master) node and Slurm Compoute (worker) nodes, which can be scaled up or down.
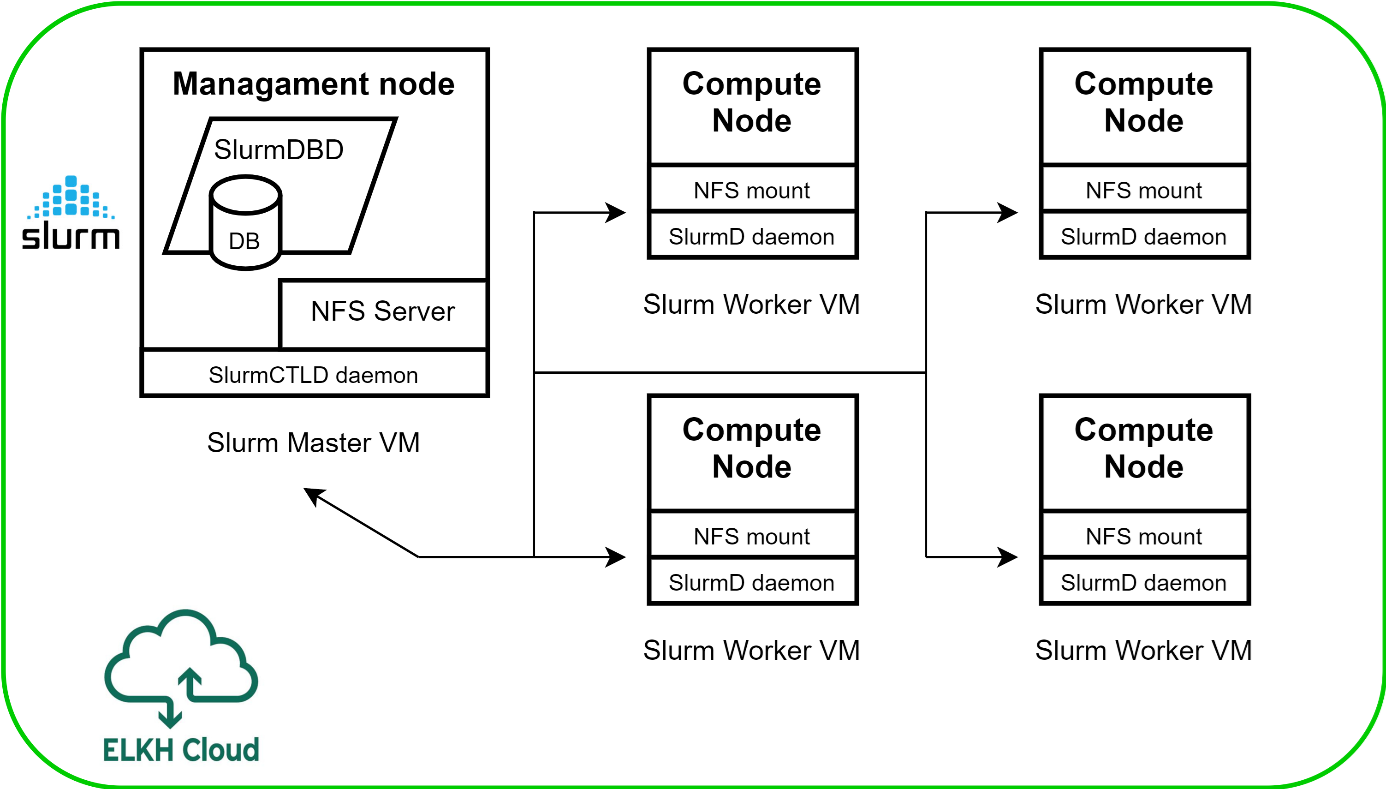
Figure 2. Slurm cluster architecture
Features
creating two types of nodes through contextualisation
utilising health check against a predefined port
using cron jobs to scale Slurm Compute nodes automatically
Prerequisites
accessing an Occopus compatible interface
target cloud contains an Ubuntu 18.04 image with cloud-init support
Download
You can download the example as tutorial.examples.slurm .
Steps
The following steps are suggested to be performed:
Open the file
nodes/node_definitions.yamland edit the resource section of the nodes labelled bynode_def:.you must select an Occopus compatible resource plugin
you can find and specify the relevant list of attributes for the plugin
you may follow the help on collecting the values of the attributes for the plugin
you may find a resource template for the plugin in the resource plugin tutorials
The downloadable package for this example contains a resource template for the nova plugin.
Components in the infrastructure connect to each other, therefore several port ranges must be opened for the VMs executing the components. Clouds implement port opening various way (e.g. security groups for OpenStack, etc). Make sure you implement port opening in your cloud for the following port ranges:
Protocol
Port(s)
Service
TCP
22
SSH
TCP
111
RPCbind
TCP
2049
NFS Server
TCP
6817
SlurmDbDPort (Master)
TCP
6818
SlurmDPort (Worker)
TCP
6819
SlurmctldPort (Master)
Note
The Slurm Master doesn’t work without any worker nodes. You can test the cluster with the sinfo command. If the Master node doesn’t recognise this command, you have to wait for the first worker node.
Make sure your authentication information is set correctly in your authentication file. You must set your email and password in the authentication file. Setting authentication information is described here.
Load the node definition for
slurm_master_nodeandslurm_worker_nodenodes into the database.Note
Make sure the proper virtualenv is activated! (source occopus/bin/activate)
Important
Occopus takes node definitions from its database when builds up the infrastructure, so importing is necessary whenever the node definition (file) changes!
occopus-import nodes/node_definitions.yaml
Update the number of worker nodes if necessary. For this, edit the
infra-slurm-clusterfile and modify theminparameter under thescalingkeyword. Currently, it is set to2.- &W name: slurm-worker type: slurm_worker_node scaling: min: 2
Start deploying the infrastructure.
occopus-build infra-slurm-cluster.yaml
Note
It may take a few minutes until the services on the master node come to live. Please, be patient!
After successful finish, the node with
ip addressandnode idare listed at the end of the logging messages and the identifier of the newly built infrastructure is printed. You can store the identifier of the infrastructure to perform further operations on your infra or alternatively you can query the identifier using the occopus-maintain command.List of nodes/ip addresses: master: <ip-address> (dfa5f4f5-7d69-432e-87f9-a37cd6376f7a) worker: <ip-address> (cae40ed8-c4f3-49cd-bc73-92a8c027ff2c) <ip-address> (8e255594-5d9a-4106-920c-62591aabd899) 77cb026b-2f81-46a5-87c5-2adf13e1b2d3You can check the health and statistics of the cluster. Please login to the master node via SSH connection.
Note
Before you run the command below, please make sure at least one worker node is connected to the master.
By default,
sinfolists the partitions that are available.sinfo PARTITION AVAIL TIMELIMIT NODES STATE NODELIST debug* up infinite 2 idle occopus-slurm-cluster-8769d296-slurm-worker-69ed479f,occopus-slurm-cluster-8769d296-slurm-worker-ef6cc071Please run the following command on the master node to check the status of the slurm controller daemon status.
sudo systemctl status slurmctld
? slurmctld.service - Slurm controller daemon
    Loaded: loaded (/lib/systemd/system/slurmctld.service; enabled; vendor preset: enabled)
    Active: active (running) since Wed 2021-07-07 17:39:08 CEST; 1min 5s ago
    Docs: man:slurmctld(8)
    Process: 13401 ExecStart=/usr/sbin/slurmctld $SLURMCTLD_OPTIONS (code=exited, status=0/SUCCESS)
Main PID: 13423 (slurmctld)
    Tasks: 11
    Memory: 2.2M
    CGroup: /system.slice/slurmctld.service
            L¦13423 /usr/sbin/slurmctld
You can also check the slurm daemon status on any of the worker nodes with the following command.
sudo systemctld status slurmd
? slurmd.service - Slurm node daemon
    Loaded: loaded (/lib/systemd/system/slurmd.service; enabled; vendor preset: enabled)
    Active: active (running) since Wed 2021-07-07 17:39:01 CEST; 3min 44s ago
    Docs: man:slurmd(8)
    Process: 7491 ExecStart=/usr/sbin/slurmd $SLURMD_OPTIONS (code=exited, status=0/SUCCESS)
Main PID: 7493 (slurmd)
    Tasks: 1
    Memory: 1.6M
    CGroup: /system.slice/slurmd.service
            L¦7493 /usr/sbin/slurmd
Finally, you may destroy the infrastructure using the infrastructure id returned by
occopus-destroyoccopus-destroy -i 77cb026b-2f81-46a5-87c5-2adf13e1b2d3
User management
In the Slurm you can use the sacctmgr command for user management. First, you need to create an account. An account is similar to a UNIX group. An account may contain multiple users, or just a single user. Accounts may be organized as a hierarchical tree. A user may belong to multiple accounts, but must have a DefaultAccount.
# Create new account
sacctmgr add account sztaki Description="Any departments"
# Show all accounts:
sacctmgr show account
Note
By default you are the root user in Slurm, so, you have to use sudo before the slurm commands if you use the ubuntu user instead of root.
Important
Before you create a Slurm user, you have to create a real unix user too!
DataAvenue cluster
Data Avenue is a data storage management service that enables to access different types of storage resources (including S3, sftp, GridFTP, iRODS, SRM servers) using a uniform interface. The provided REST API allows of performing all the typical storage operations such as creating folders/buckets, renaming or deleting files/folders, uploading/downloading files, or copying/moving files/folders between different storage resources, respectively, even simply using ‘curl’ from command line. Data Avenue automatically translates users’ REST commands to the appropriate storage protocols, and manages long-running data transfers in the background.
In this tutorial we establish a cluster with two nodes types. On the DataAvenue node the DataAvenue application will run, and an S3 storage will run, in order to be able to try DataAvenue file transfer software such as making buckets, download or copy files. We used MinIO and Docker components to build-up the cluster.
Features
creating two types of nodes through contextualisation
using the nova resource handler
Prerequisites
accessing an Occopus compatible interface
target cloud contains an Ubuntu image with cloud-init support
Download
You can download the example as tutorial.examples.dataavenue-cluster .
Steps
The following steps are suggested to be performed:
Open the file
nodes/node_definitions.yamland edit the resource section of the nodes labelled bynode_def:.you must select an Occopus compatible resource plugin
you can find and specify the relevant list of attributes for the plugin
you may follow the help on collecting the values of the attributes for the plugin
you may find a resource template for the plugin in the resource plugin tutorials
The downloadable package for this example contains a resource template for the nova plugin.
Components in the infrastructure connect to each other, therefore several port ranges must be opened for the VMs executing the components. Clouds implement port opening various way (e.g. security groups for OpenStack, etc). Make sure you implement port opening in your cloud for the following port ranges:
Protocol
Port(s)
Service
TCP
22
SSH
TCP
80
HTTP
TCP
443
HTTPS
TCP
8080
DA service
Make sure your authentication information is set correctly in your authentication file. You must set your authentication data for the
resourceyou would like to use. Setting authentication information is described here.Optionally edit the “variables” section of the
infra-dataavenue.yamlfile. Set the following attributes:access_keyis the access key of the S3 storage usersecret_keyis the secret key of the S3 storage user
Load the node definitions into the database. Make sure the proper virtualenv is activated!
Important
Occopus takes node definitions from its database when builds up the infrastructure, so importing is necessary whenever the node definition or any imported (e.g. contextualisation) file changes!
occopus-import nodes/node_definitions.yaml
Start deploying the infrastructure.
occopus-build infra-dataavenue.yaml
After successful finish, the nodes with
ip addressandnode idare listed at the end of the logging messages and the identifier of the newly built infrastructure is printed. You can store the identifier of the infrastructure to perform further operations on your infra or alternatively you can query the identifier using the occopus-maintain command.List of nodes/ip addresses: dataavenue: 192.168.xxx.xxx (34b07a23-a26a-4a42-a5f4-73966b8ed23f) storage: 192.168.xxx.xxx (29b98290-c6f4-4ae7-95ca-b91a9baf2ea8) db0f0047-f7e6-428e-a10d-3b8f7dbdb4d4On the S3 storage nodes a user with predefined parameters will be created. The
access_keywill be the Username and thesecret_keywill be the Password, which are predefined in theinfra-dataavenue.yamlfile. Save user credentials into a file namedcredentialsuse the above command:echo -e 'X-Key: dataavenue-key\nX-Username: A8Q2WPCWAELW61RWDGO8\nX-Password: FWd1mccBfnw6VHa2vod98NEQktRCYlCronxbO1aQ' > credentials
Note
This step will be useful to shorten the curl commands later when using DataAvenue!
Save the nodes’ ip addresses in variables to simplify the use of commands.
export SOURCE_NODE_IP=[storage_a_ip]
export TARGET_NODE_IP=[storage_b_ip]
export DATAAVENUE_NODE_IP=[dataavenue_ip]
Make bucket on each S3 storage node:
curl -H "$(cat credentials)" -X POST -H "X-URI: s3://$SOURCE_NODE_IP:80/sourcebucket/" http://$DATAAVENUE_NODE_IP:8080/dataavenue/rest/directory
curl -H "$(cat credentials)" -X POST -H "X-URI: s3://$TARGET_NODE_IP:80/targetbucket/" http://$DATAAVENUE_NODE_IP:8080/dataavenue/rest/directory
Note
Bucket names should be at least three letter length. Now, the bucket on the source S3 storage node will be
sourcebucket, and the bucket on the target S3 storage node will betargetbucket.Check the bucket creation by listing the buckets on each storage node:
curl -H "$(cat credentials)" -H "X-URI: s3://$SOURCE_NODE_IP:80/" http://$DATAAVENUE_NODE_IP:8080/dataavenue/rest/directory
The result should be:
["sourcebucket/"]curl -H "$(cat credentials)" -H "X-URI: s3://$TARGET_NODE_IP:80/" http://$DATAAVENUE_NODE_IP:8080/dataavenue/rest/directory
The result should be:
["targetbucket/"]To test the DataAvenue file transfer software you should make a file to be transfered. With this command you can create predefined sized file, now it will be 1 megabyte:
dd if=/dev/urandom of=1MB.dat bs=1M count=1
Upload the generated
1MB.datfile to the source storage node:curl -H "$(cat credentials)" -X POST -H "X-URI: s3://$SOURCE_NODE_IP:80/sourcebucket/1MB.dat" -H 'Content-Type: application/octet-stream' --data-binary @1MB.dat http://$DATAAVENUE_NODE_IP:8080/dataavenue/rest/file
Check the uploaded file by listing the
sourcebucketbucket on the source node:curl -H "$(cat credentials)" -H "X-URI: s3://$SOURCE_NODE_IP:80/sourcebucket" http://$DATAAVENUE_NODE_IP:8080/dataavenue/rest/directory
The result should be: ["1MB.dat"]
Save the target node’s credentials to a
target.jsonfile to shorten the copy command later:echo "{target:'s3://"$TARGET_NODE_IP":80/targetbucket/',overwrite:true,credentials:{Type:UserPass, UserID:"A8Q2WPCWAELW61RWDGO8", UserPass:"FWd1mccBfnw6VHa2vod98NEQktRCYlCronxbO1aQ"}}" > target.json
Copy the uploaded 1MB.dat file from the source node to the target node:
curl -H "$(cat credentials)" -X POST -H "X-URI: s3://$SOURCE_NODE_IP:80/sourcebucket/1MB.dat" -H "Content-type: application/json" --data "$(cat target.json)" http://$DATAAVENUE_NODE_IP:8080/dataavenue/rest/transfers > transferid
The result should be:
[transfer_id]Check the result of the copy command by querying the
transfer_idreturned by the copy command:curl -H "$(cat credentials)" http://$DATAAVENUE_NODE_IP:8080/dataavenue/rest/transfers/$(cat transferid)
The following result means a successful copy transfer from the source node to the target node (see status: DONE):
"bytesTransferred":1048576,"source":"s3://[storage_a_ip]:80/sourcebucket/1MB.dat","status":"DONE","serverTime":1507637326644,"target":"s3://[storage_b_ip]:80/targetbucket/1MB.dat","ended":1507637273245,"started":1507637271709,"size":1048576
You can list the files in the target node’s bucket, to check the 1MB file:
curl -H "$(cat credentials)" -H "X-URI: s3://$TARGET_NODE_IP:80/targetbucket" http://$DATAAVENUE_NODE_IP:8080/dataavenue/rest/directory
The result should be:
["1MB.dat"]. TAlso, you can download the copied file from the target node:
curl -H "$(cat credentials)" -H "X-URI: s3://$TARGET_NODE_IP:80/targetbucket/1MB.dat" -o download.dat http://$DATAAVENUE_NODE_IP:8080/dataavenue/rest/file
Finally, you may destroy the infrastructure using the infrastructure id returned by
occopus-buildoccopus-destroy -i db0f0047-f7e6-428e-a10d-3b8f7dbdb4d4
Note
In this tutorial we used HTTP protocol only. DataAvenue also supports HTTPS on port 8443; storages could also be accessed over secure HTTP by deploying e.g. HAPROXY on their nodes.
CQueue cluster
CQueue stands for “Container Queue”. Since Docker does not provide pull model for container execution, (Docker Swarm uses push execution model) the CQueue framework provides a lightweight queueing service for executing containers.
Figure 1 shows, the overall architecture of a CQueue cluster. The CQueue cluster contains one Master node (VM1) and any number of Worker nodes (VM2). Worker nodes can be manually scaled up and down with Occopus. The Master node implements a queue (see “Q” box within VM1), where each item (called task in CQueue) represents the specification of a container execution (image, command, arguments, etc.). The Worker nodes (VM2) fetch the tasks one after the other and execute the container specified by the task (see “A” box within VM2). In each task submission a new Docker container will be launched within at CQueue Worker.
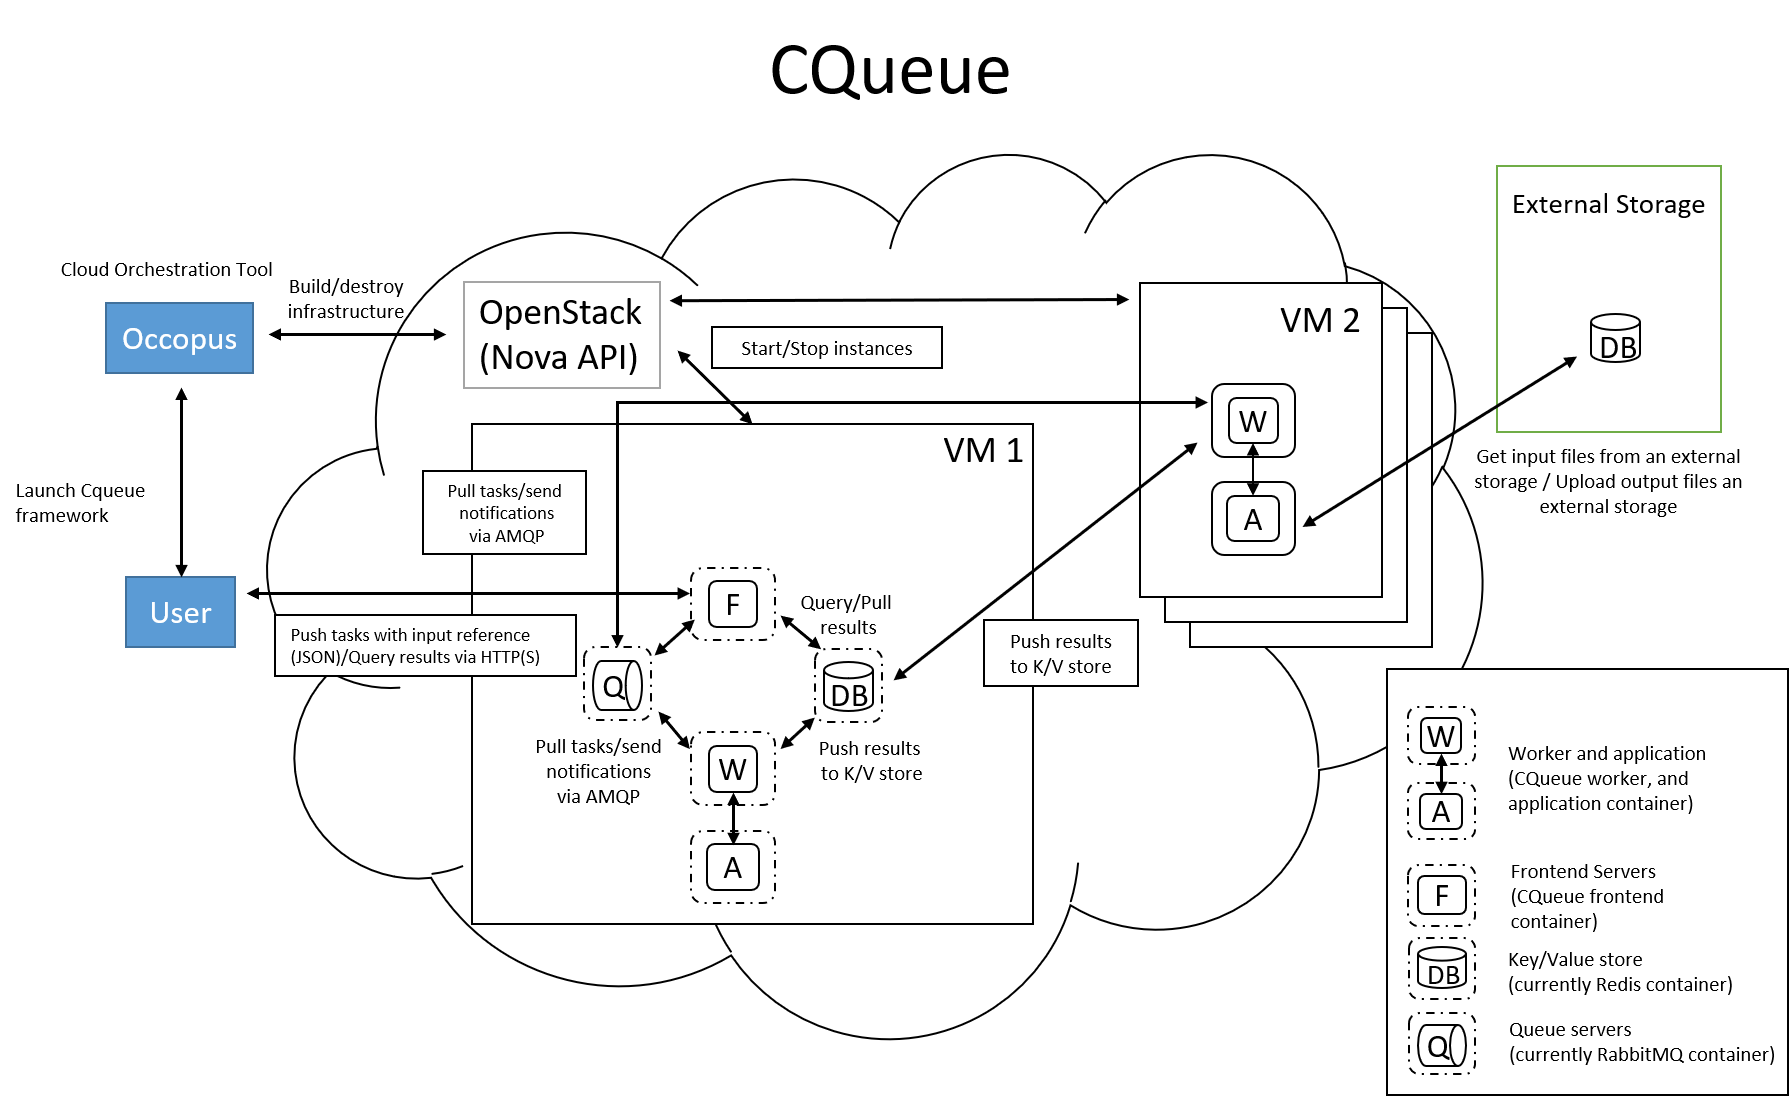
Figure 1. CQueue cluster architecture
Please, note that CQueue is not aware of what happens inside the container, simply executes them one after the other. CQueue does not handle data files, containers are responsible for downloading inputs and uploading results if necessary. For each container CQueue stores the logs (see “DB” box within VM1), and the return value. CQueue retries the execution of failed containers as well.
In case the container hosts an application, CQueue can be used for executing jobs, where each job is realized by one single container execution. To use CQueue for huge number of job execution, prepare your container and generate the list of container execution in a parameter sweep style.
In this tutorial we deploy a CQueue cluster with two nodes: 1) a Master node (see VM1 on Figure 1) having a RabbitMQ (for queuing) (see “Q” box within VM1), a Redis (for storing container logs) (see “DB” within VM1), and a web-based frontend (for providing a REST API and a basic WebUI) component (see “F” in VM1); 2) a Worker node (see VM2 on Figure 1) containing a CQueue worker component (see “W” box within VM2) which pulls tasks from the Master and performs the execution of containers specified by the tasks (see “A” box in VM2).
There are three use-cases identified for using CQueue.
Use-case 1 (Container executation)
The first use-case uses Container executor, i.e. the application container managed by the CQueue worker. After the application container (task) finished, the result saved on the result backend. (Redis)
curl -H 'Content-Type: application/json' -X POST -d'{"image":"ubuntu", "cmd":["echo", "test msg"]}' http://localhost:8080/task
Use-case 2 (Local executation)
The second use-case runs the task in the worker container. The container runs the given task, and after the execution, the worker container saves the result to the result backend.
curl -H 'Content-Type: application/json' -X POST -d'{"type":"local", "cmd":["echo", "test msg"]}' http://localhost:8080/task
Note
If you like to use this method, it is necessary to build the CQueue worker in the application container.
Use-case 3 (Batch executation)
In this use-case, the application runs in the worker container similarly to the second use-case, but it will define multiple tasks. In this mode, CQueue is capable of creating an iterable parameter in the application with the syntax of {{.}}. In this mode, it is necessary to define the start, and the stop parameter and CQueue will iterate over it. This execution mode can result in a very significant performance improvement when the tasks running times are short.
curl -H 'Content-Type: application/json' -X POST -d'{"type":"batch", "start":"1" , "stop":"10", "cmd":["echo", "run {{.}}.cfg"]}' http://localhost:8080/task
Note
If you like to use this method, it is necessary to build the CQueue worker in the application container.
Note
To create a worker with batch capabilities, the worker must be started with --batch=true flag.
Features
creating two types of nodes through contextualisation
using the nova resource handler
using parameters to scale up worker nodes
Prerequisites
accessing an Occopus compatible interface
target cloud contains an Ubuntu image with cloud-init support
Download
You can download the example as tutorial.examples.cqueue-cluster .
Steps
The following steps are suggested to be performed:
Open the file
nodes/node_definitions.yamland edit the resource section of the nodes labelled bynode_def:.you must select an Occopus compatible resource plugin
you can find and specify the relevant list of attributes for the plugin
you may follow the help on collecting the values of the attributes for the plugin
you may find a resource template for the plugin in the resource plugin tutorials
Note
In this tutorial, we will use nova cloud resources (based on our nova tutorials in the basic tutorial section). However, feel free to use any Occopus-compatible cloud resource for the nodes, but we suggest to instantiate all nodes in the same cloud.
Components in the infrastructure connect to each other, therefore several port ranges must be opened for the VMs executing the components. Clouds implement port opening various way (e.g. security groups for OpenStack, etc). Make sure you implement port opening in your cloud for the following port ranges:
Protocol
Port(s)
Service
TCP
22
SSH
TCP
5672
AMQP
TCP
6379
Redis server
TCP
8080
CQueue frontend
TCP
15672
RabbitMQ management
Make sure your authentication information is set correctly in your authentication file. You must set your authentication data for the
resourceyou would like to use. Setting authentication information is described here.Update the number of worker nodes if necessary. For this, edit the
infra-cqueue-cluster.yamlfile and modify the min and max parameter under the scaling keyword. Scaling is the interval, in which the number of nodes can change (min, max). Currently, the minimum is set to 1 (which will be the initial number at startup).- &W name: cqueue-worker type: cqueue-worker_node scaling: min: 1
Important
Important: Keep in mind that Occopus has to start at least one node from each node type to work properly and scaling can be applied only for worker nodes in this example!
Load the node definitions into the database. Make sure the proper virtualenv is activated!
Important
Occopus takes node definitions from its database when builds up the infrastructure, so importing is necessary whenever the node definition or any imported (e.g. contextualisation) file changes!
occopus-import nodes/node_definitions.yaml
Start deploying the infrastructure.
occopus-build infra-cqueue-cluster.yaml
After successful finish, the nodes with
ip addressandnode idare listed at the end of the logging messages and the identifier of the newly built infrastructure is printed. You can store the identifier of the infrastructure to perform further operations on your infra or alternatively you can query the identifier using the occopus-maintain command.List of nodes/ip addresses: cqueue-worker: 192.168.xxx.xxx (34b07a23-a26a-4a42-a5f4-73966b8ed23f) cqueue-master: 192.168.xxx.xxx (29b98290-c6f4-4ae7-95ca-b91a9baf2ea8) db0f0047-f7e6-428e-a10d-3b8f7dbdb4d4After a successful built, tasks can be sent to the CQueue master. The framework is built for executing Docker containers with their specific inputs. Also, environment variables and other input parameters can be specified for each container. The CQueue master receives the tasks via a REST API and the CQueue workers pull the tasks from the CQueue master and execute them. One worker process one task at a time.
Push ‘hello world’ task (available parameters: image string, env []string, cmd []string, container_name string):
curl -H 'Content-Type: application/json' -X POST -d'{"image":"ubuntu", "cmd":["echo", "hello Docker"]}' http://<masterip>:8080/task

The result should be: ``{"id":"task_324c5ec3-56b0-4ff3-ab5c-66e5e47c30e9"}``
Note
This id (task_324c5ec3-56b0-4ff3-ab5c-66e5e47c30e9) will be used later, in order to query its status and result.
The worker continuously updates the status (pending, received, started, retry, success, failure) of the task with the task’s ID. After the task is completed, the workers send a notification to the CQueue master, and this task will be removed from the queue. The status of a task and the result can be queried from the key-value store through the CQueue master.
Check the result of the push command by querying the task_id returned by the push command:
curl -X GET http://<masterip>:8080/task/$task_idThe result should be:
{"status":"SUCCESS"}
Fetch the result of the push command by querying the
task_idreturned by the push command:curl -X GET http://<masterip>:8080/task/$task_id/resultThe result should be:
hello DockerDelete the task with the following command:
curl -X DELETE http://<masterip>:8080/task/$task_idFor debugging, check the logs of the container at the CQueue worker node.
docker logs -f $(containerID)
Finally, you may destroy the infrastructure using the infrastructure id returned by
occopus-buildoccopus-destroy -i db0f0047-f7e6-428e-a10d-3b8f7dbdb4d4
Note
The CQueue master and the worker components are written in golang, and they have a shared code-base. The open-source code is available at GitLab .