This tutorial sets up a complete Apache Hadoop (version 3.3.0) infrastructure. It contains a Hadoop Master node and Hadoop Slave worker nodes, which can be scaled up or down. To register Hadoop Slave nodes Consul is used.
Features
creating two types of nodes through contextualisation
utilising health check against a predefined port
using scaling parameters to limit the number of Hadoop Slave nodes
manage cluster nodes with Consul
Prerequisites
accessing a cloud through an Occopus-compatible interface (e.g EC2, Nova, Azure, etc.)
target cloud contains a base Ubuntu OS image with cloud-init support
In this tutorial, we will use nova cloud resources (based on our nova tutorials in the basic tutorial section). However, feel free to use any Occopus-compatible cloud resource for the nodes, but we suggest to instantiate all nodes in the same cloud.
Steps
Open the file nodes/node_definitions.yaml and edit the resource section of the nodes labelled by node_def:.
The downloadable package for this example contains a resource template for the Nova plugin.
Important
Do not modify the values of the contextualisation and the health_check section’s attributes!
Important
Do not specify the server_name attribute for slaves so they are named automatically by Occopus to make sure node names are unique!
Note
If you want Occopus to monitor (health_check) your Hadoop Master and it is to be deployed in a different network, make sure you assign public (floating) IP to the Master node.
Components in the infrastructure connect to each other, therefore several port ranges must be opened for the VMs executing the components. Clouds implement port opening various way (e.g. security groups for OpenStack, etc). Make sure you implement port opening in your cloud for the following port ranges:
Protocol
Port(s)
Service
TCP
22
SSH
TCP
8025
TCP
8042
TCP
8088
TCP
8300-8600
TCP
9000
TCP
50000-51000
Make sure your authentication information is set correctly in your authentication file. You must set your authentication data for the resource you would like to use. Setting authentication information is described here.
Update the number of Hadoop Slave worker nodes if necessary. For this, edit the infra-occopus-hadoop.yaml file and modifiy the min and max parameter under the scaling keyword. Scaling is the interval in which the number of nodes can change (min, max). Currently, the minimum is set to 2 (which will be the initial number at startup), and the maximum is set to 10.
Important: Keep in mind that Occopus has to start at least one node from each node type to work properly and scaling can be applied only for Hadoop Slave nodes in this example!
Load the node definitions into the database. Make sure the proper virtualenv is activated!
Important
Occopus takes node definitions from its database when builds up the infrastructure, so importing is necessary whenever the node definition or any imported (e.g. contextualisation) file changes!
occopus-import nodes/node_definitions.yaml
Start deploying the infrastructure.
occopus-build infra-hadoop-cluster.yaml
After successful finish, the nodes with ipaddress and nodeid are listed at the end of the logging messages and the identifier of the newly built infrastructure is printed. You can store the identifier of the infrastructure to perform further operations on your infra or alternatively you can query the identifier using the occopus-maintain command.
List of nodes/ip addresses:
hadoop-master:
192.168.xxx.xxx (3116eaf5-89e7-405f-ab94-9550ba1d0a7c)
hadoop-slave:
192.168.xxx.xxx (23f13bd1-25e7-30a1-c1b4-39c3da15a456)192.168.xxx.xxx (7b387348-b3a3-5556-83c3-26c43d498f39)14032858-d628-40a2-b611-71381bd463fa
You can check the health and statistics of the cluster through the following web pages:
Health of nodes: http://[HadoopMasterIP]:9870
Job statistics: http://[HadoopMasterIP]:8088
To launch a Hadoop MapReduce job copy your input and executable files to the Hadoop Master node, and perform the submission described here.
Finally, you may destroy the infrastructure using the infrastructure id returned by occopus-build
This tutorial sets up a complete Apache Spark (version 3.0.1) infrastructure with HDFS (Hadoop Distributed File System) (version 3.3.0) and RStudio server. Apache Spark is a fast and general-purpose cluster computing system. It provides high-level APIs in Java, Scala, Python and R, and an optimized engine that supports general execution graphs. It also supports a rich set of higher-level tools including Spark SQL for SQL and structured data processing, MLlib for machine learning, GraphX for graph processing, and Spark Streaming. For more information visit the official Apache Spark page .
Apache Spark cluster together with HDFS (Hadoop Distributed File System) represents one of the most important tool for Big Data and machine learning applications, enabling the parallel processing of large data sets on many virtual machines, which are running Spark workers. On the other hand, setting up a Spark cluster with HDFS on clouds is not straightforward, requiring deep knowledge of both cloud and Apache Spark architecture. To save this hard work for scientists we have created and made public the required infrastructure descriptors by which Occopus can automatically deploy Spark clusters with the number of workers specified by the user.
One of the most typical application area of Big Data technology is the statistical data processing that is usually done by the programming language R. In order to facilitate the work of statisticians using Spark on cloud, we have created an extended version of the Spark infrastructure descriptors placing the sparklyr library on Spark workers, too. Finally, we have also integrated the user-friendly RStudio user interface into the Spark system. As a result, researchers using the statistical R package can easily and quickly deploy a complete R-oriented Spark cluster on clouds containing the following components: RStudio, R, sparklyr, Spark and HDFS.
This tutorial sets up a complete Apache Spark infrastructure integrated with HDFS, R, RStudio and sparklyr. It contains a Spark Master node and Spark Worker nodes, which can be scaled up or down.
Features
creating two types of nodes through contextualisation
utilising health check against a predefined port
using scaling parameters to limit the number of Spark Worker nodes
Prerequisites
accessing a cloud through an Occopus-compatible interface (e.g EC2, Nova, Azure, etc.)
target cloud contains a base Ubuntu OS image with cloud-init support
In this tutorial, we will use nova cloud resources (based on our nova tutorials in the basic tutorial section). However, feel free to use any Occopus-compatible cloud resource for the nodes, but we suggest to instantiate all nodes in the same cloud.
Steps
Open the file nodes/node_definitions.yaml and edit the resource section of the nodes labelled by node_def:.
The downloadable package for this example contains a resource template for the Nova plugin.
Important
Do not modify the values of the contextualisation and the health_check section’s attributes!
Important
Do not specify the server_name attribute for workers so they are named automatically by Occopus to make sure node names are unique!
Note
If you want Occopus to monitor (health_check) your Spark Master and it is to be deployed in a different network, make sure you assign public (floating) IP to the Master node.
Generally speaking, a Spark cluster and its services are not deployed on the public internet. They are generally private services, and should only be accessible within the network of the organization that deploys Spark. Access to the hosts and ports used by Spark services should be limited to origin hosts that need to access the services. This means that you need to create a firewall rule to allow all traffic between Spark nodes and the required ports [web UI and job submission port(s)] should be allowed only from your IP address.
Main UI port list:
Port
Description
4040
Application port (active only if a Spark application is running)
6066
Submit job to cluster via REST API
7077
Submit job to cluster/Join to the cluster
8080
Master UI
8081
Worker UI
9870
HDFS NameNode UI
Make sure your authentication information is set correctly in your authentication file. You must set your authentication data for the resource you would like to use. Setting authentication information is described here.
Update the number of Spark Worker nodes if necessary. For this, edit the infra-occopus-spark.yaml file and modifiy the min and max parameter under the scaling keyword. Scaling is the interval in which the number of nodes can change (min, max). Currently, the minimum is set to 2 (which will be the initial number at startup), and the maximum is set to 10.
Important: Keep in mind that Occopus has to start at least one node from each node type to work properly and scaling can be applied only for Spark Worker nodes in this example!
Load the node definitions into the database. Make sure the proper virtualenv is activated!
Important
Occopus takes node definitions from its database when builds up the infrastructure, so importing is necessary whenever the node definition or any imported (e.g. contextualisation) file changes!
occopus-import nodes/node_definitions.yaml
Start deploying the infrastructure.
occopus-build infra-spark-cluster.yaml
After successful finish, the nodes with ipaddress and nodeid are listed at the end of the logging messages and the identifier of the newly built infrastructure is printed. You can store the identifier of the infrastructure to perform further operations on your infra or alternatively you can query the identifier using the occopus-maintain command.
List of nodes/ip addresses:
spark-master:
192.168.xxx.xxx (3116eaf5-89e7-405f-ab94-9550ba1d0a7c)
spark-worker:
192.168.xxx.xxx (23f13bd1-25e7-30a1-c1b4-39c3da15a456)192.168.xxx.xxx (7b387348-b3a3-5556-83c3-26c43d498f39)14032858-d628-40a2-b611-71381bd463fa
You can check the health and statistics of the cluster through the following web pages:
HDFS NameNode UI: http://<SparkMasterIP>:9870
Spark UI: http://<SparkMasterIP>:8080
Spark Application UI: http://<SparkMasterIP>:4040 (active only if a Spark application is running)
Note
The webUIs are protected, the access needs a login. The default username/password is spark/lpds, which can be changed before deployment.
Testing RStudio
The RStudio’s web interface can be access via http://<SparkMasterIP>:8787, logging with the sparkuser/lpds username/password pair.
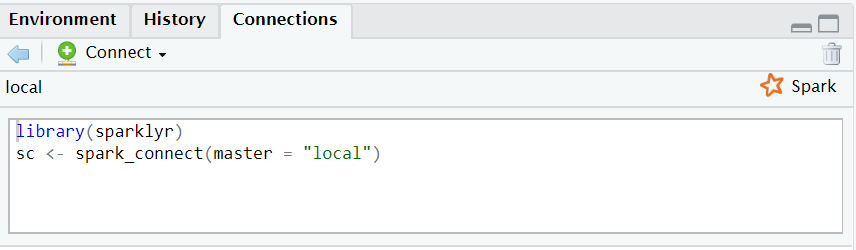
In this test, we download the “sparklyr” package for Spark, load it into R, enter the path to our Spark directory, and create the Spark Context to run the code. When the Spark Context is created, our application is also displayed on the Application UI interface under Running Applications, available at http: // <SparkMasterIP>: 4040. An active Spark Context session can also be found on the interface of RStudio, in the upper right corner, under the “Connections” tab, the Spark logo appears with the configurations of Spark Context.
Note
Downloading new packages may take a few minutes.
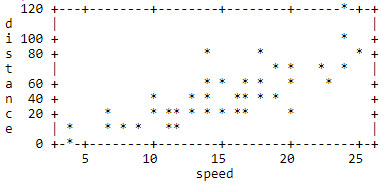
The result of the test are numbers listed from 1 to 5. This test shows that the Spark Master ran with Spark R. The last line closes the application, otherwise Spark Context will run forever and a new application would not get new resources. (see Figure 1.)
The first three rows are the same as those of the second test, but we have repeated them for the sake of completeness. In this test, we download the “sparklyr” package required to use Spark, load it into R, enter the path of our Spark directory and create the Spark Context to run the code.
Note
Downloading new packages may take a few minutes.
Important
Do not forget to update placeholders.
When the Spark Context is created, the application is also displayed on the Application UI interface under Running Applications available at http: // <SparkMasterIP>: 4040.
An active Spark Context session can also be seen on the RStudio interface, in the upper right corner, under the “Connections” tab, the Spark logo appears with the configurations of Spark Context, now with the Spark Master IP address.
The test results are the same, numbers listed 1 through 5 (see Figure 1). This test shows that in the Spark cluster, the task was run in parallel, distributed along with R. The last line closes the application, otherwise Spark Context will run indefinitely, so the new application will not get new resources.
Apache Spark cluster with Jupyter notebook and PySpark
This tutorial sets up a complete Apache Spark (version 3.0.1) infrastructure with HDFS (Hadoop Distributed File System) (version 3.3.0) and PySpark. Apache Spark is a fast and general-purpose cluster computing system. It provides high-level APIs in Java, Scala, Python and R, and an optimized engine that supports general execution graphs. It also supports a rich set of higher-level tools including Spark SQL for SQL and structured data processing, MLlib for machine learning, GraphX for graph processing, and Spark Streaming. For more information visit the official Apache Spark page .
Apache Spark cluster together with HDFS (Hadoop Distributed File System) represents one of the most important tool for Big Data and machine learning applications, enabling the parallel processing of large data sets on many virtual machines, which are running Spark workers. On the other hand, setting up a Spark cluster with HDFS on clouds is not straightforward, requiring deep knowledge of both cloud and Apache Spark architecture. To save this hard work for scientists we have created and made public the required infrastructure descriptors by which Occopus can automatically deploy Spark clusters with the number of workers specified by the user.
Spark also provides a special library called “Spark MLlib” for supporting machine learning applications. Similarly, to the R-oriented Spark environment, we have developed the infrastructure descriptors for the creation of a machine learning environment in the cloud. Here, the programming language is Python and the user programming environment is Jupyter. The complete machine learning environment consists of the following components: Jupyter, Python, Spark and HDFS. Deploying this machine learning environment is also automatically done by Occopus and the number of Spark workers can be defined by the user.
This tutorial sets up a complete Apache Spark infrastructure integrated with HDFS, Python and Jupyter Notebook. It contains a Spark Master node and Spark Worker nodes, which can be scaled up or down.
Features
creating two types of nodes through contextualisation
utilising health check against a predefined port
using scaling parameters to limit the number of Spark Worker nodes
Prerequisites
accessing a cloud through an Occopus-compatible interface (e.g EC2, Nova, Azure, etc.)
target cloud contains a base Ubuntu OS image with cloud-init support
In this tutorial, we will use nova cloud resources (based on our nova tutorials in the basic tutorial section). However, feel free to use any Occopus-compatible cloud resource for the nodes, but we suggest to instantiate all nodes in the same cloud.
Steps
Open the file nodes/node_definitions.yaml and edit the resource section of the nodes labelled by node_def:.
The downloadable package for this example contains a resource template for the Nova plugin.
Important
Do not modify the values of the contextualisation and the health_check section’s attributes!
Important
Do not specify the server_name attribute for workers so they are named automatically by Occopus to make sure node names are unique!
Note
If you want Occopus to monitor (health_check) your Spark Master and it is to be deployed in a different network, make sure you assign public (floating) IP to the Master node.
Generally speaking, a Spark cluster and its services are not deployed on the public internet. They are generally private services, and should only be accessible within the network of the organization that deploys Spark. Access to the hosts and ports used by Spark services should be limited to origin hosts that need to access the services.
This means that you need to create a firewall rule to allow all traffic between Spark nodes and the required ports [web UI and job submission port(s)] should be allowed only from your IP address.
Main UI port list:
Port
Description
4040
Application port (active only if a Spark application is running)
6066
Submit job to cluster via REST API
7077
Submit job to cluster/Join to the cluster
8080
Master UI
8081
Worker UI
9870
HDFS NameNode UI
Make sure your authentication information is set correctly in your authentication file. You must set your authentication data for the resource you would like to use. Setting authentication information is described here.
Update the number of Spark Worker nodes if necessary. For this, edit the infra-occopus-spark.yaml file and modifiy the min and max parameter under the scaling keyword. Scaling is the interval in which the number of nodes can change (min, max). Currently, the minimum is set to 2 (which will be the initial number at startup), and the maximum is set to 10.
Important: Keep in mind that Occopus has to start at least one node from each node type to work properly and scaling can be applied only for Spark Worker nodes in this example!
Load the node definitions into the database. Make sure the proper virtualenv is activated!
Important
Occopus takes node definitions from its database when builds up the infrastructure, so importing is necessary whenever the node definition or any imported (e.g. contextualisation) file changes!
occopus-import nodes/node_definitions.yaml
Start deploying the infrastructure.
occopus-build infra-spark-cluster.yaml
After successful finish, the nodes with ipaddress and nodeid are listed at the end of the logging messages and the identifier of the newly built infrastructure is printed. You can store the identifier of the infrastructure to perform further operations on your infra or alternatively you can query the identifier using the occopus-maintain command.
List of nodes/ip addresses:
spark-master:
192.168.xxx.xxx (3116eaf5-89e7-405f-ab94-9550ba1d0a7c)
spark-worker:
192.168.xxx.xxx (23f13bd1-25e7-30a1-c1b4-39c3da15a456)192.168.xxx.xxx (7b387348-b3a3-5556-83c3-26c43d498f39)14032858-d628-40a2-b611-71381bd463fa
Note
After Occopus finished the infrastructure, the Worker instance takes some time to finish the deployment process via cloud-init.
You can check the health and statistics of the cluster through the following web pages:
HDFS NameNode UI: http://<SparkMasterIP>:9870
Spark UI: http://<SparkMasterIP>:8080
Spark Application UI: http://<SparkMasterIP>:4040 (active only if a Spark application is running)
Note
The webUIs are protected, the access needs a login. The default username/password is spark/lpds, which can be changed before deployment.
Testing with Jupyter Notebook
The Jupyter notebook’s web interface can be access via http://<SparkMasterIP>:8888. Here, you can upload and run Jupyter notebooks and try out the prepared demo notebook.
Note
The webUIs are protected, the access needs a login. The default password is “lpds”, which can be changed before deployment.
Finally, you may destroy the infrastructure using the infrastructure id returned by occopus-build
TensorFlow is an end-to-end open source platform for machine learning. It has a comprehensive, flexible ecosystem of tools, libraries and community resources that lets researchers push the state-of-the-art in ML and developers easily build and deploy ML powered applications. TensorFlow was developed by the Google Brain team for internal Google use. It was released under the Apache License 2.0 on November 9, 2015. For more information visit the official TensorFlow page .
Keras is a high-level neural networks API, written in Python and capable of running on top of TensorFlow, CNTK, or Theano. It was developed with a focus on enabling fast experimentation. Being able to go from idea to result with the least possible delay is key to doing good research. Keras contains numerous implementations of commonly used neural-network building blocks such as layers, objectives, activation functions, optimizers, and a host of tools to make working with image and text data easier. In addition to standard neural networks, Keras has support for convolutional and recurrent neural networks. It supports other common utility layers like dropout, batch normalization, and pooling. For more information visit the official Keras page .
The complete machine learning environment consists of the following components: Jupyter, Keras (version 2.2.4) and TensorFlow (version 1.13.1).
Features
creating a node through contextualisation
utilising health check against a predefined port
Prerequisites
accessing a cloud through an Occopus-compatible interface (e.g EC2, Nova, Azure, etc.)
target cloud contains a base Ubuntu OS image with cloud-init support
In this tutorial, we will use nova cloud resources (based on our nova tutorials in the basic tutorial section). However, feel free to use any Occopus-compatible cloud resource for the nodes, but we suggest to instantiate all nodes in the same cloud.
Steps
Open the file nodes/node_definitions.yaml and edit the resource section of the nodes labelled by node_def:.
The downloadable package for this example contains a resource template for the Nova plugin.
Important
Do not modify the values of the contextualisation and the health_check section’s attribute!
Note
If you want Occopus to monitor (health_check) your initiated virtual machine and it is to be deployed in a different network, make sure you assign public (floating) IP to the node.
Services on the virtual machine should be available from outside, therefore some port numbers must be opened for the VM executing the components. Clouds implement port opening various way (e.g. security groups for OpenStack, etc). Make sure you implement port opening in your cloud for the following port ranges:
Protocol
Port(s)
Service
TCP
22
SSH
TCP
8888
Jupyter Notebook
Make sure your authentication information is set correctly in your authentication file. You must set your authentication data for the resource you would like to use. Setting authentication information is described here.
Load the node definitions into the database. Make sure the proper virtualenv is activated!
Important
Occopus takes node definitions from its database when builds up the infrastructure, so importing is necessary whenever the node definition or any imported (e.g. contextualisation) file changes!
occopus-import nodes/node_definitions.yaml
Start deploying the infrastructure.
occopus-build infra-jupyter-server.yaml
After successful finish, the node with ipaddress and nodeid is listed at the end of the logging messages and the identifier of the newly built infrastructure is printed. You can store the identifier of the infrastructure to perform further operations on your infra or alternatively you can query the identifier using the occopus-maintain command.
List of nodes/ip addresses:
jupyter-server:
192.168.xxx.xxx (3116eaf5-89e7-405f-ab94-9550ba1d0a7c)14032858-d628-40a2-b611-71381bd463fa
You can start using the TensorFlow/Keras stack through the Jupyter notebook using your web browster at the following URL:
Jupyter notebook: http://<JupyterServerIP>:8888
Note
The webUIs are protected, the access needs a login. The default password is “lpds”, which can be changed before deployment.
Run a demo ML application. Select tensorflow-demo/TensorFlowDemoWithPictures.ipynb file within the Jupyter notebook interface, and select Cells/Run All to run all of the commands below, or use shift+enter within a cell to run the cells one-by-one.
Finally, you may destroy the infrastructure using the infrastructure id returned by occopus-build
TensorFlow is an end-to-end open source platform for machine learning. It has a comprehensive, flexible ecosystem of tools, libraries and community resources that lets researchers push the state-of-the-art in ML and developers easily build and deploy ML powered applications. TensorFlow was developed by the Google Brain team for internal Google use. It was released under the Apache License 2.0 on November 9, 2015. For more information visit the official TensorFlow page .
The complete machine learning environment consists of the following components: JupyterLab and TensorFlow 2 utilizing the power of a GPU card.
Important
If you want to use this tutorial, your virtual machine should have an attached NVIDIA GPU card. If you would like to alter the CUDA driver, feel free to personalize the install-cuda.sh script within nodes/cloud_init_jupyter_server_gpu.yaml file.
Features
creating a node through contextualisation
utilising health check against a predefined port
Prerequisites
accessing a cloud through an Occopus-compatible interface (e.g EC2, Nova, Azure, etc.)
target cloud contains a base Ubuntu 20.04 OS image with cloud-init support and Docker CE
In this tutorial, we will use nova cloud resources (based on our nova tutorials in the basic tutorial section). However, feel free to use any Occopus-compatible cloud resource for the nodes, but we suggest to instantiate all nodes in the same cloud.
Steps
Open the file nodes/node_definitions.yaml and edit the resource section of the nodes labelled by node_def:.
The downloadable package for this example contains a resource template for the Nova plugin.
Important
Do not modify the values of the contextualisation and the health_check section’s attribute!
Note
Make sure you assign public (floating) IP to the node.
Services on the virtual machine should be available from outside, therefore some port numbers must be opened for the VM executing the components. Clouds implement port opening various way (e.g. security groups for OpenStack, etc). Make sure you implement port opening in your cloud for the following port ranges:
Protocol
Port(s)
Service
TCP
22
SSH
TCP
8888
Jupyter Notebook
Make sure your authentication information is set correctly in your authentication file. You must set your authentication data for the resource you would like to use. Setting authentication information is described here.
Load the node definitions into the database. Make sure the proper virtualenv is activated!
Important
Occopus takes node definitions from its database when builds up the infrastructure, so importing is necessary whenever the node definition or any imported (e.g. contextualisation) file changes!
occopus-import nodes/node_definitions.yaml
Start deploying the infrastructure.
occopus-build infra-tensorflow.yaml
After successful finish, the node with ipaddress and nodeid is listed at the end of the logging messages and the identifier of the newly built infrastructure is printed. You can store the identifier of the infrastructure to perform further operations on your infra or alternatively you can query the identifier using the occopus-maintain command.
List of nodes/ip addresses:
jupyter-server-gpu:
192.168.xxx.xxx (3116eaf5-89e7-405f-ab94-9550ba1d0a7c)14032858-d628-40a2-b611-71381bd463fa
You can start using the TensorFlow/Keras stack through the Jupyter notebook using your web browster at the following URL:
Jupyter notebook: `http://<JupyterServerIP>:8888`
Note
The webUIs are protected, the access needs a login. The default password is “tensorflow”, which can be changed before deployment.
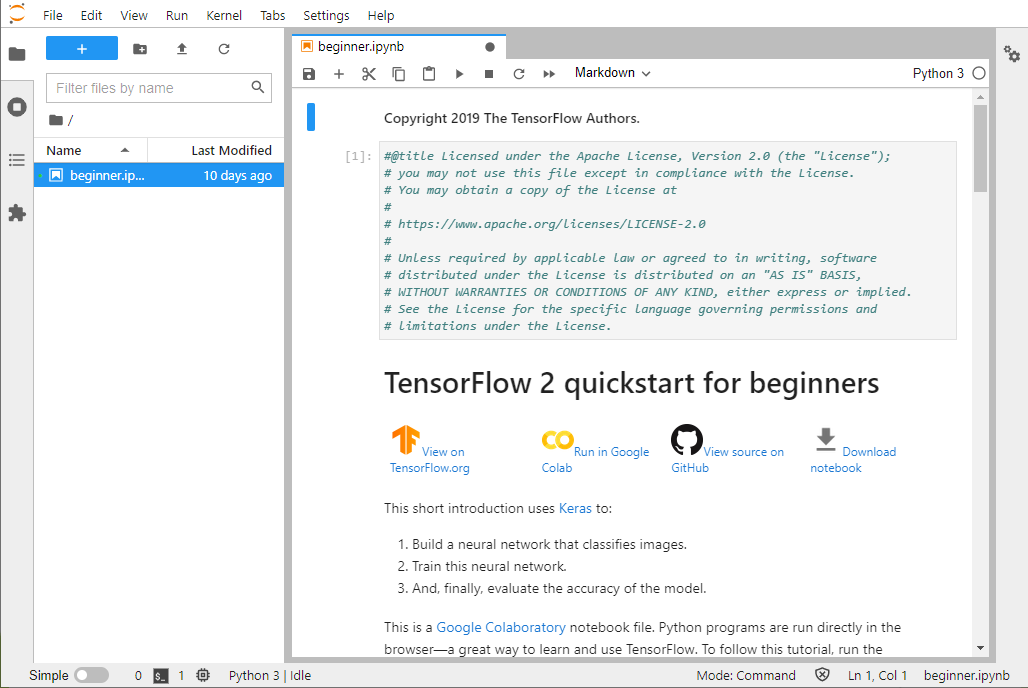
Select beginner.ipynb file (see Figure 1) within the JupyterLab interface, and select Cells/Run All to run all of the commands below, or use shift+enter within a cell to run the cells one-by-one.
Figure 1: Jupyter Notebook for testing TensorFlow 2 environment with GPU
Finally, you may destroy the infrastructure using the infrastructure id returned by occopus-build
The Jupyter Notebook is an open-source web application that allows you to create and share documents that contain live code, equations, visualizations and narrative text. Uses include: data cleaning and transformation, numerical simulation, statistical modeling, data visualization, machine learning, and much more. The notebook extends the console-based approach to interactive computing in a qualitatively new direction, providing a web-based application suitable for capturing the whole computation process: developing, documenting, and executing code, as well as communicating the results.
The Jupyter Notebook combines two components:
A web application: a browser-based tool for interactive authoring of documents which combine explanatory text, mathematics, computations and their rich media output.
Notebook documents: a representation of all content visible in the web application, including inputs and outputs of the computations, explanatory text, mathematics, images, and rich media representations of objects.
JupyterLab is the next-generation web-based user interface for Project Jupyter, it’s a web-based interactive development environment for Jupyter notebooks, code, and data. JupyterLab is flexible: configure and arrange the user interface to support a wide range of workflows in data science, scientific computing, and machine learning. JupyterLab is extensible and modular: write plugins that add new components and integrate with existing ones.
Compared to the classical web user interface where users can manage Jupyter Notebooks (available at http://<JupyterLabIP>:8888/tree) JupyterLab (available at http://<JupyterLabIP>:8888/lab) provides a more modern user interface where users can install extensions to satisfy their needs and improve their productivity using the Extension Manager.
In this tutorial, we will use nova cloud resources (based on our nova tutorials in the basic tutorial section). However, feel free to use any Occopus-compatible cloud resource for the nodes, but we suggest to instantiate all nodes in the same cloud.
Steps
Open the file nodes/node_definitions.yaml and edit the resource section of the nodes labelled by node_def:.
The downloadable package for this example contains a resource template for the Nova plugin.
Important
For the JupyterLab extensions to work properly, the recommended resources are VCPU:2, RAM:4GB
Important
Do not modify the values of the contextualisation and the health_check section’s attribute!
Note
If you want Occopus to monitor (health_check) your initiated virtual machine and it is to be deployed in a different network, make sure you assign public (floating) IP to the node.
Open the file nodes/infra-jupyterlab.yaml and edit the variables section labelled by variables. The default username is “jovyan” and the default password is “lpds”. Change the value of pwd_jupyterlab to a safe password!
Important
Make sure the default password is changed, because the JupyterLab environment is exposed publicly on the Internet and anyone with access to the password could execute arbitrary code on the underlying virtual machine with root privileges!
Services on the virtual machine should be available from outside, therefore some port numbers must be opened for the VM executing the components. Clouds implement port opening various way (e.g. security groups for OpenStack, etc). Make sure you implement port opening in your cloud for the following port ranges:
Protocol
Port(s)
Service
TCP
22
SSH
TCP
8888
Jupyter Notebook
Make sure your authentication information is set correctly in your authentication file. You must set your authentication data for the resource you would like to use. Setting authentication information is described here.
Load the node definitions into the database. Make sure the proper virtualenv is activated!
Important
Occopus takes node definitions from its database when builds up the infrastructure, so importing is necessary whenever the node definition or any imported (e.g. contextualisation) file changes!
occopus-import nodes/node_definitions.yaml
Start deploying the infrastructure.
occopus-build infra-jupyterlab.yaml
After successful finish, the node with ipaddress and nodeid is listed at the end of the logging messages and the identifier of the newly built infrastructure is printed. You can store the identifier of the infrastructure to perform further operations on your infra or alternatively you can query the identifier using the occopus-maintain command.
List of nodes/instances/addresses:
jupyterlab:
    3116eaf5-89e7-405f-ab94-9550ba1d0a7c
      192.168.xxx.xxx

14032858-d628-40a2-b611-71381bd463fa
You can start using JupyterLab using your web browster at the following URL:
JupyterLab: http://<JupyterLabIP>:8888
Note
The JupyterLab web user interface is password protected, enter the password that was set in nodes/infra-jupyterlab.yaml
Finally, you may destroy the infrastructure using the infrastructure id returned by occopus-build